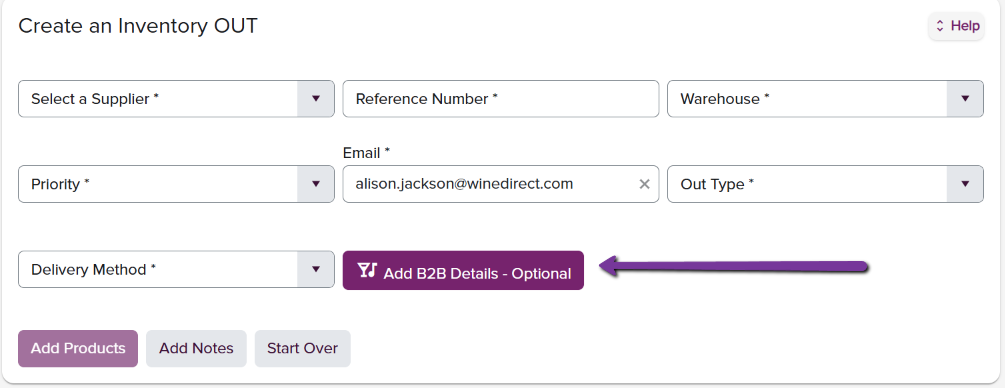
This article will provide instructions on how to create an Inventory Out Request. To begin, the user will need to select a record from the dropdown attributes:
Select a Supplier: this is the Winery/Client Name
Destination Warehouse: location of the WineDirect Fulfillment Center where inventory is to be pulled from
- Glenwillow
- Green Island
- Paso Robles
- Santa Maria
- Willamette Valley
Priority
- Normal: indicates our normal SLA of 48 business hours/2 (two) business days
- Rush: alerts the fulfillment team to prepare and stage the requested SKUs for immediate client pickup. Due to this being a stop process on the floor, a $50.00 charge is incurred for the use of this priority.
Transfer Type*
- Bonded Inventory Out: “bonded” signifies that the wine is stored in a bonded warehouse and has not yet had excise taxes (like duty and VAT) paid on it.
- Long Term Inventory Out: This selection will pull allocated wine from the library storage, where it is located.
- Short-Term Inventory Out: this type of OUT should be used for general inventory residing in the Primary or other adjacent sub-inventories.
- Warehouse Transfer: this type of OUT should be selected for transferring inventory from one WineDirect warehouse to another for bi-coastal clients; formally known as an Inter-Center warehouse transfer. Click here to learn more about Inter-Center Warehouse Transfers
Delivery Method
- WD Delivery to Client
- WD Shipment to Client
- WD transfer to Glenwillow FC*
- WD transfer to WDI FC*
*to be used with the transfer type of warehouse transfer
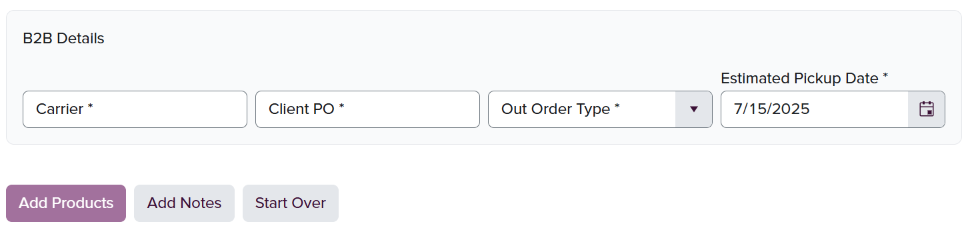
NEW! Add B2B Details (optional) For clients who wish to have wholesale OUTs collected at the originating WineDirect Fulfillment center, this section is available to enter in the vendor details:
- Carrier
- Client P.O.
- OUT Order Type
- DTT (Delivery to Terminal, for freight purposes)
- Wholesale
- Estimated Pickup Date
 Add Products: A dropdown of available SKUs will populate, allowing the user to type or select the requested line item.
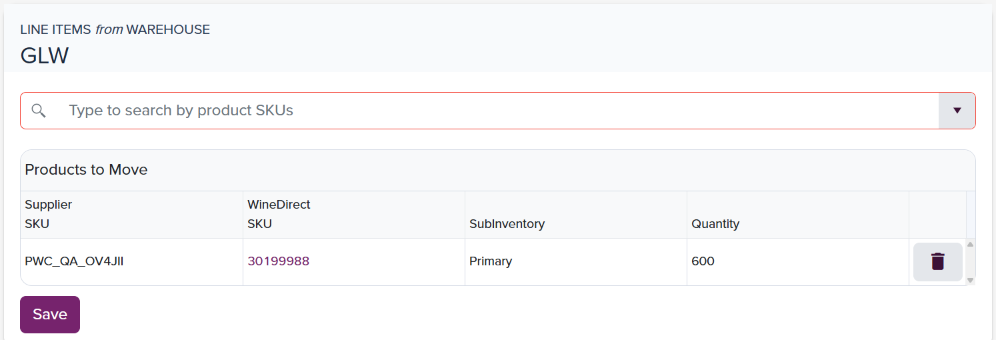 Subinventory: Select the subinventory that the requested SKU is being pulled from.
Quantity: Once the designated subinventory has been selected, the quantity field will populate with the number of available units/bottles for transfer. The selected quantity cannot exceed the available quantity listed for any given SKU.
Add Notes: The user can leave additional information here that will be visible to the warehouse inventory team. Examples of notes could be: reference numbers to other inventory submissions, communication to our warehouse delivery driver, etc.
**NEW! Add Files (optional): For clients who wish to include external files with their OUT submission, click the Add Files icon.
Subinventory: Select the subinventory that the requested SKU is being pulled from.
Quantity: Once the designated subinventory has been selected, the quantity field will populate with the number of available units/bottles for transfer. The selected quantity cannot exceed the available quantity listed for any given SKU.
Add Notes: The user can leave additional information here that will be visible to the warehouse inventory team. Examples of notes could be: reference numbers to other inventory submissions, communication to our warehouse delivery driver, etc.
**NEW! Add Files (optional): For clients who wish to include external files with their OUT submission, click the Add Files icon.
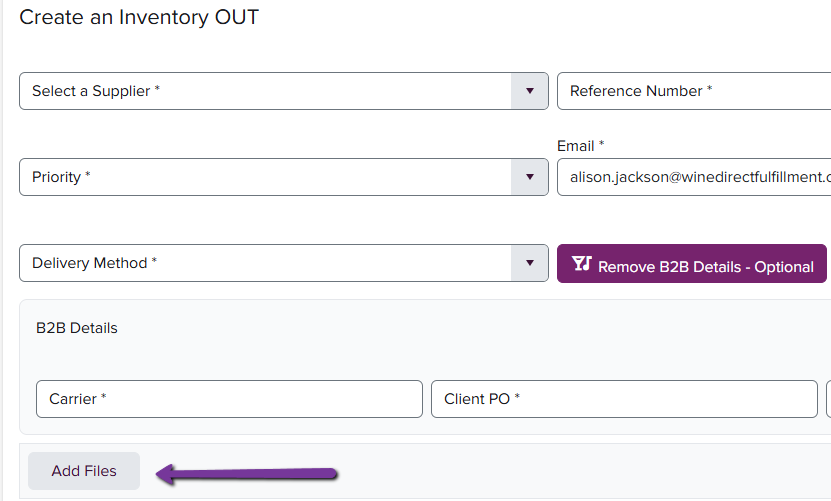 By clicking this icon, the system will open the user’s file folder, allowing them to select the specific file they wish to include within the OUT submission.
The above steps can then be repeated until all requested SKUs have been added to the Inventory OUT
Submit the Order: When the order has been completed, the user can click Submit the Order
Start Over: Should the submission need to be canceled, this button will remove all information from the system and allow the user to begin again.
By clicking this icon, the system will open the user’s file folder, allowing them to select the specific file they wish to include within the OUT submission.
The above steps can then be repeated until all requested SKUs have been added to the Inventory OUT
Submit the Order: When the order has been completed, the user can click Submit the Order
Start Over: Should the submission need to be canceled, this button will remove all information from the system and allow the user to begin again.
New: Additonal B2B search filters have been added to the Search Inventory OUT section, allowing you to search for your B2B OUT submissions even faster!
